How to Install and Configure DNS on Windows 2008 Server
| |
This tutorial is for client-managed Dedicated Servers or VPS servers, not running a Control Panel administration (i.e. - not running Plesk or Helm).
** Before you set up DNS on your server, be sure you have registered your private nameservers at your Domain Registrar. Tutorials for the most common domain registrars are available in our Knowledge base.
PART 1 - DNS SERVER INSTALLATION To install a DNS server from the Control Panel, follow these steps: From the Start menu, select Administrative Tools --> Server Manager. 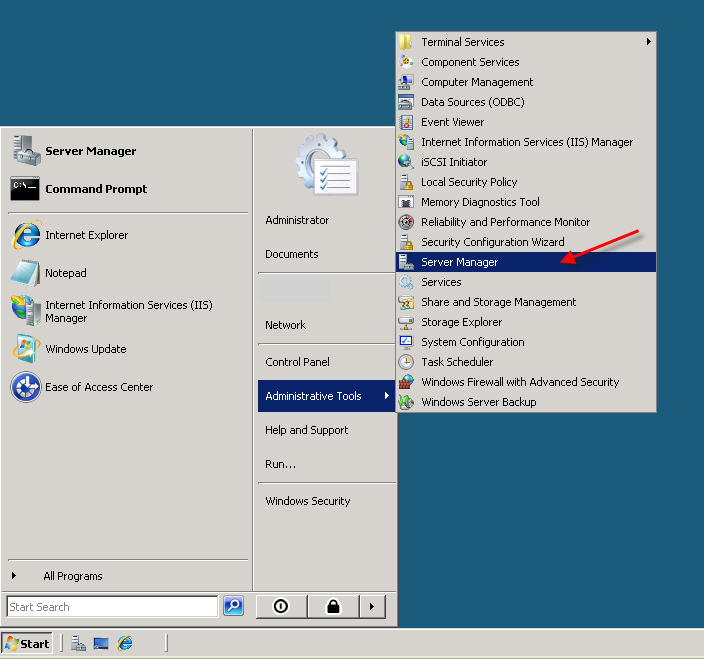 Expand and click Roles from the left window. Choose Add Roles 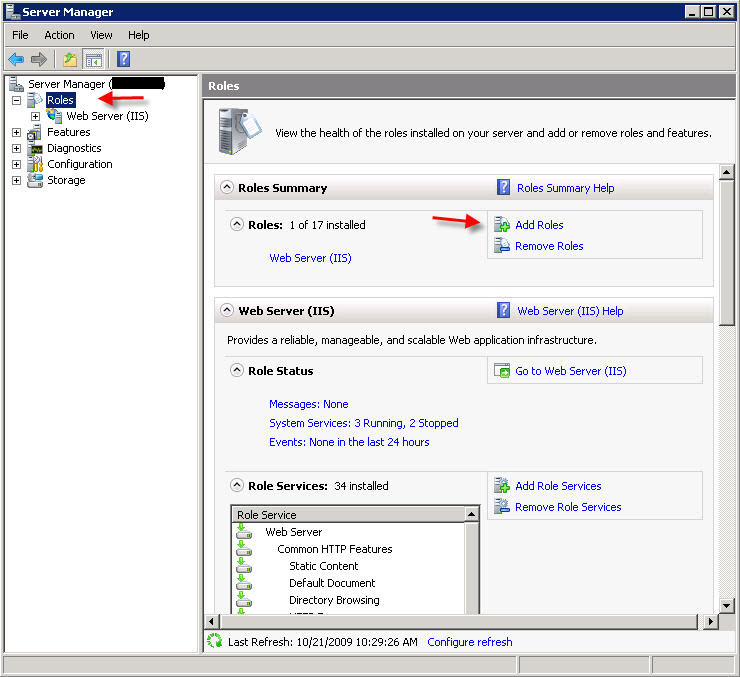 Follow the wizard by selecting the DNS Server role (leave any previously checked items checked) 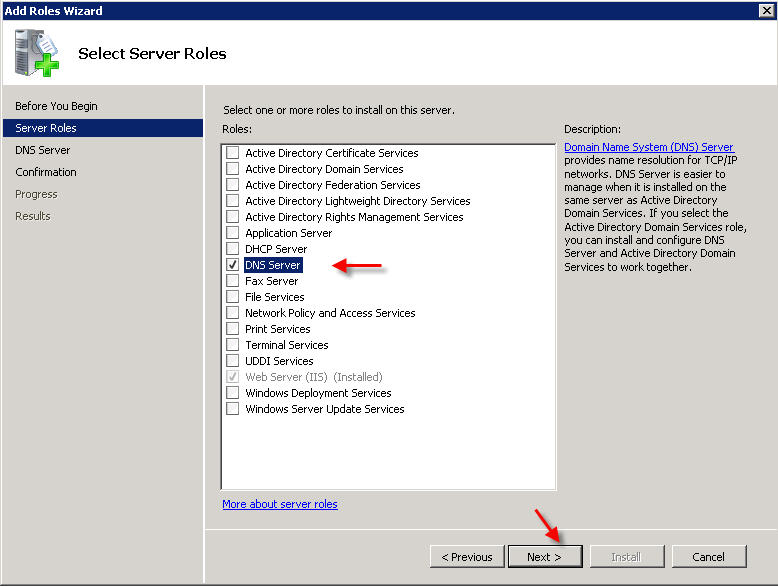 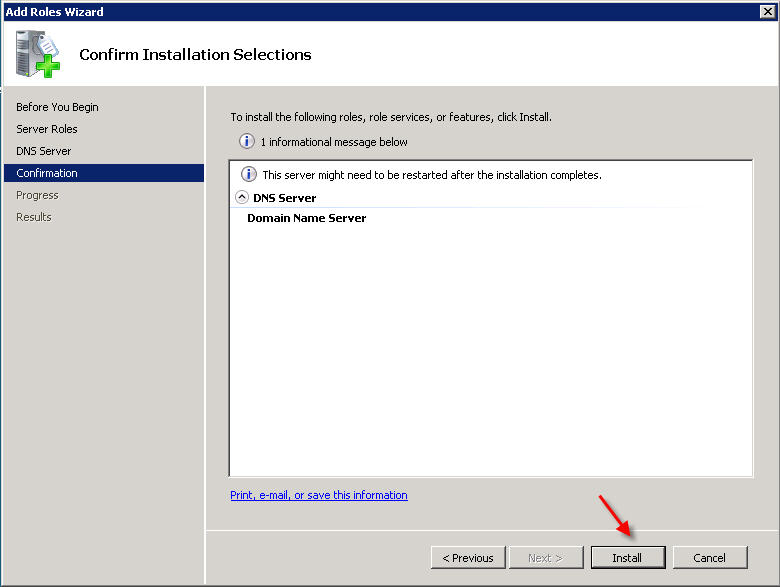  PART 2 - DNS SERVER CONFIGURATION From the Start menu, select Administrative Tools --> DNS to open the DNS console.  Highlight your computer name and choose Configure a DNS Server to launch the Configure DNS Server Wizard. 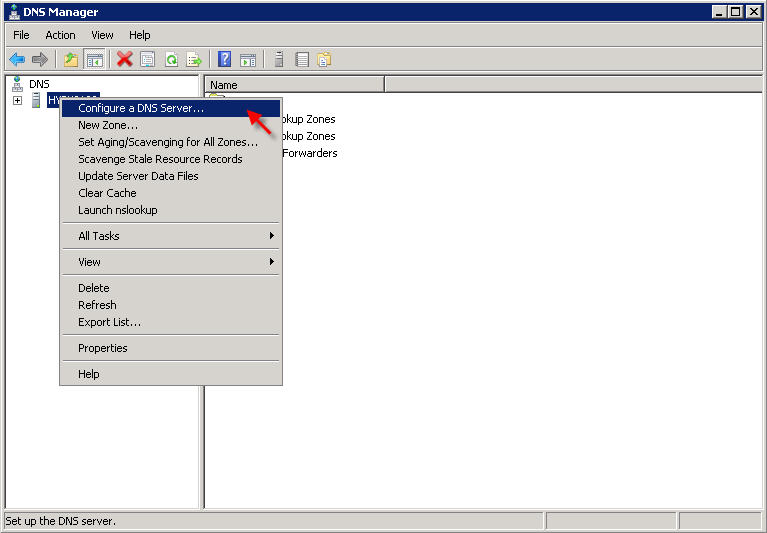 Click NEXT and then select the first option, Create a Forward lookup zone 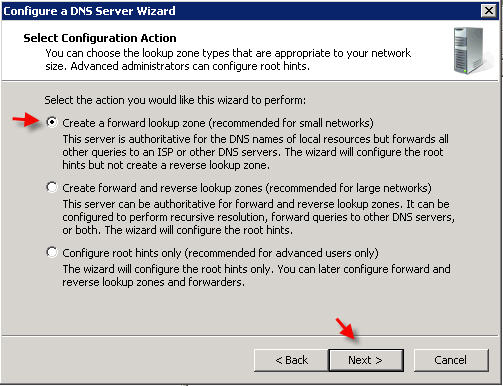 On the next screen, leave the default option selected, This Server maintains the zone, and click NEXT
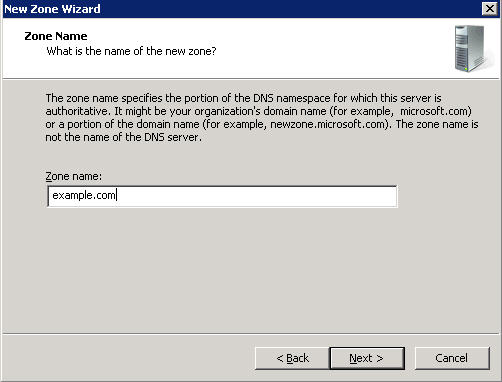
Now you will need to enter the domain name that you want to create your first zone file for. We are using "example.com" in this tutorial:
 Click NEXT, and NEXT again on the next two screens 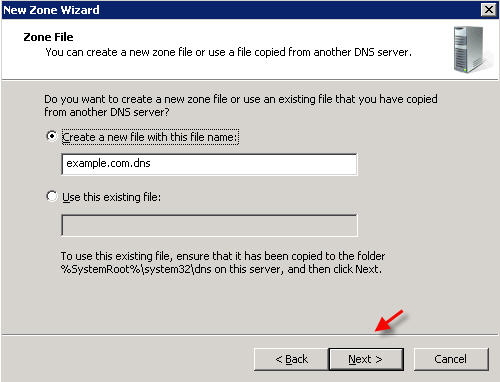 Â Â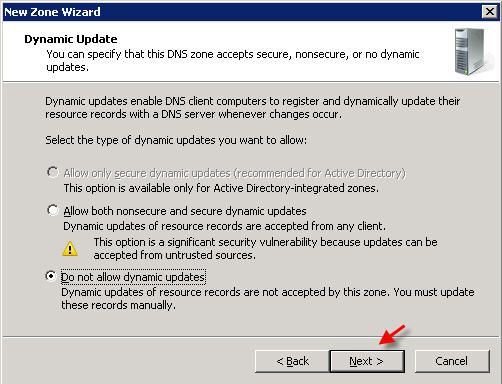 On the Forwarders screen, select the option "No, it should not forward queries" 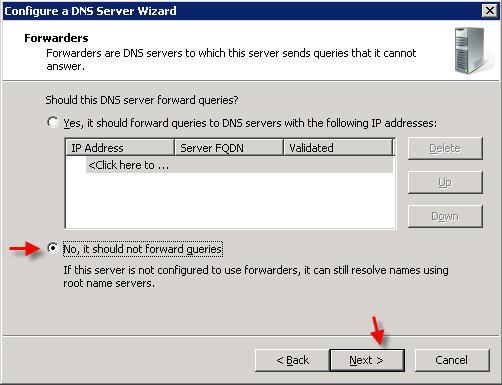 Click FINISH PART 3 - MANAGING DNS RECORDS
There are many types of DNS records, this is a basic tutorial and will show you how to point your domain name to the IP address you assigned to your web site via an A record. You can also create other types of DNS records (MX, CNAME,etc) in a similar fashion.
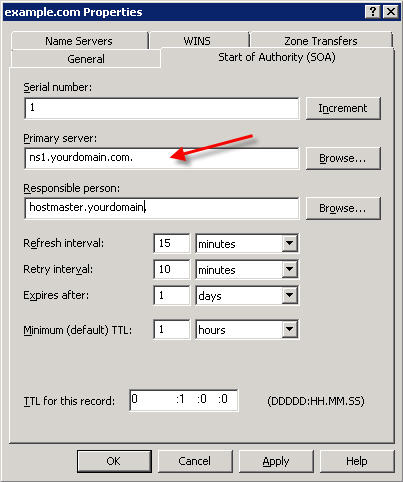
In DNS Manager, expand your server name, then expand the 'Forward Lookup Zones' , right-click on your domain name and select Properties 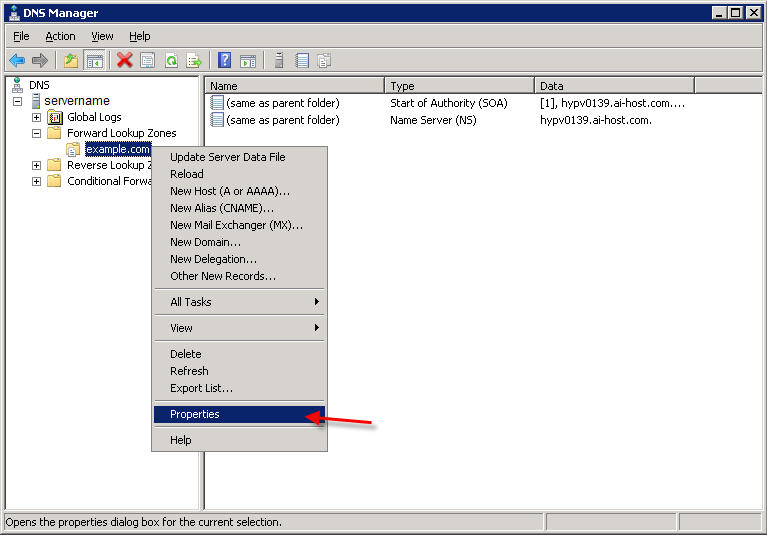 Click on the Start of Authority (SOA) tab.
The SOA resource record is always the first record in a DNS zone. Set the Primary Server to your primary nameserver:
 Next, click on the Name Servers tab.
Remove anything currently listed, and click Add and enter your nameservers (i.e. - ns1.yourdomain.com , ns2.yourdomain.com)

When done, click OK to close the window. You are now ready to set up your zone records.
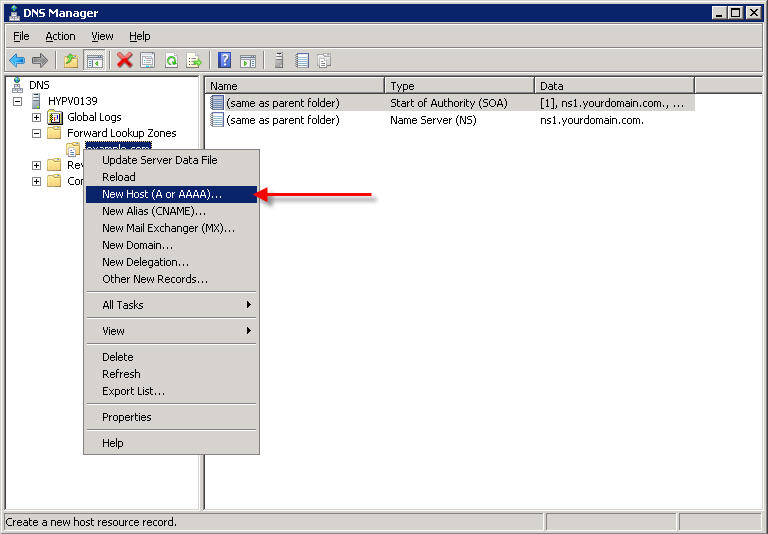
Right-click on your domain name under Forward Lookup Zones, and select New Host (A or AAAA)...
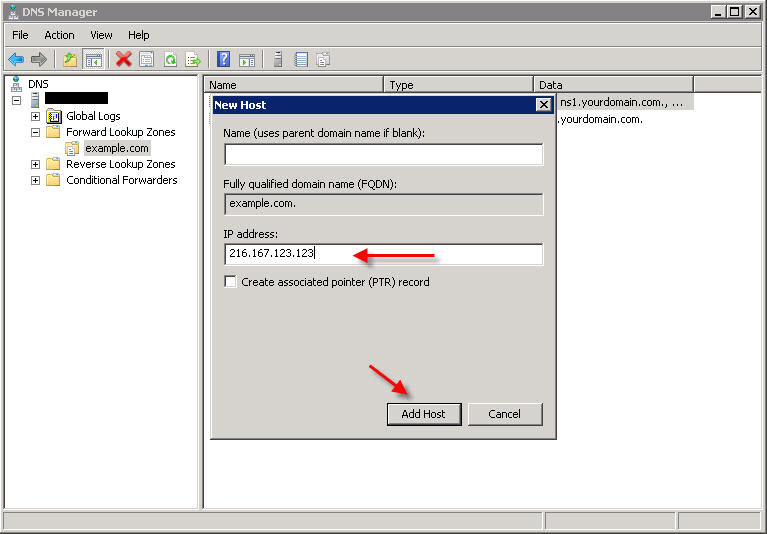
Leave the Name field blank, and under IP Address, enter the IP address you configured for this web site in IIS, and click Add Host.
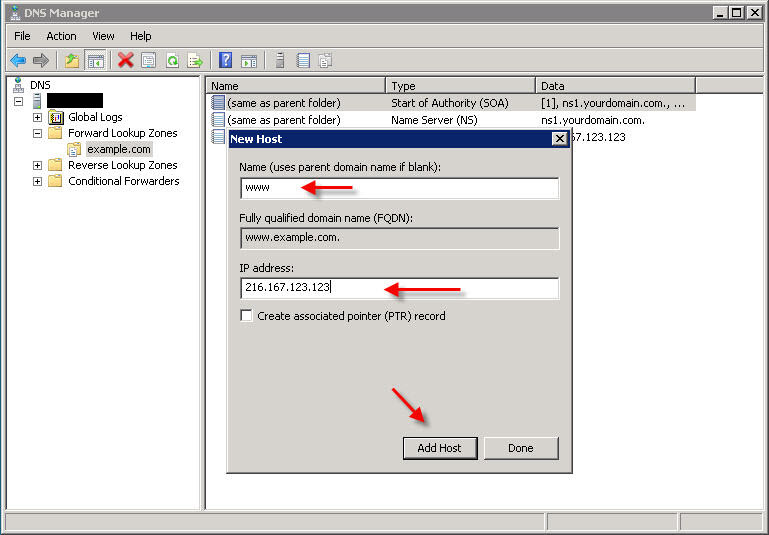
You will most likely also want to make a record for 'www', so repeat the above step but this time instead of leaving the Name field blank, enter www in that field:
 PART 4 - DISABLE DNS RECURSION The final step you'll want to perform is to disable DNS recursion. This will help secure your server from a variety of DNS recursion attacks. To disable recursion, right-click on your DNS server and go to 'Properties'. Click the 'Advanced' tab. Then check the box labeled "Disable recursion"  Congratulations! You have now set up DNS in Windows Server 2008 and have set up DNS records for your domain name.
You can create additional DNS records as needed (MX, CNAME, etc) by right-clicking on the domain under Forward Lookup Zones and selecting the appropriate type of record you wish to create.
You can test that your DNS server is properly serving DNS from a Windows command prompt, by using the nslookup command in this format:
nslookup example.com ns1.yourdomain.com
For example: 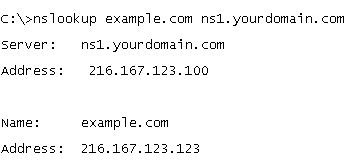 | |
Sunday, 1 December 2013
Install BIND DNS on Windows Web Server 2008
( Berkeley Internet Name Domain )
Since Windows Server 2003 there has been a low cost entry in the server SKUs and that has been the Windows Web Server edition.
The 2003 version of this edition was severely limited by licensing to what you could install and do on it, and was really only a solution for the most basic of web sites. The 2008 version has had most of those limits removed and is now a much more viable alternative for hosts and companies looking for a economical Windows based web server running IIS7.
One of the most glaring oversights for this edition of Windows Web Server is the exclusion of the DNS role. I understand the argument from Microsoft that if you are running this edition of server more than likely your hosting company will have a DNS infrastructure in place and most users can and will use that.
I counter that with the fact that I like to control my own DNS name servers and records and do not like having to deal with a hosting company infrastructure that may or may not be streamlined for DNS requests.
I have read in various forums that the Server team is looking into this and it may change in the future, but for now we will have to find another solution for this problem. This low cost (free) solution is going to be — installing BIND DNS on the server and configuring it to handle DNS queries.
Today I’ll focus on the installation part and in Part 2 I’ll show you how to configure BIND DNS on Windows Web Server 2008.
BIND DNS Server
BIND (Berkeley Internet Name Domain) is an open source implementation of Domain Name System (DNS) protocols distributed for free under the BSD License. It is currently maintained on the Internet Systems Consortium and is used by the majority of the DNS servers on the Internet.
The current version we are going to be using in this article is BIND 9.5.0-P2-W2 (Windows-specific fixes). You can download the current version at:
Creating a User Account for BIND
BIND requires a local user with only "Log on as a service" privilege. The installer will actually check for this, and if the user has more rights it will ask if you really want to use that ID. The default user for the BIND installer is named, but you can do any other name you want.
1. Open the Computer Management console
2. Select Local Users and Groups and then right click on Users, select New User…

3. Fill in the new user information, I am going to use the following and then clickCreate before closing the New User window:
User name: named
Description: BIND DNS Account
Password: %password%
Confirm Password: %password%
Unselect: User must change password at next logon
Select: User cannot change password
Select: Password never expires
Description: BIND DNS Account
Password: %password%
Confirm Password: %password%
Unselect: User must change password at next logon
Select: User cannot change password
Select: Password never expires

4. Now open the Local Security Policy MMC from the Administrative Tools Menu.

5. Expand Local Policies then select User Rights Assignment in the policy pane; scroll down and right click on Log on as a service, then left clickProperties.

6. Click on Add User or Group…

7. Type in the user account you created, in our case the default named, then click Check Names to make sure you typed it correctly, then click Ok.

8. Click Ok to exit the properties box, and you should see the account listed now next to the Log on as a service policy.

That’s it for the user account for now. Later you will have to give the account you created read/write rights to the directory you install BIND into, but that will be covered in a bit.
Install BIND DNS on Windows Web Server 2008
This is where we will walk through the install and initial configuration of BIND DNS. Let’s get started!
1. Unzip the download and then click on BindInstall.exe to start the installation.
2. The installer will ask for the following information:
Target Directory: Your choice
Service Account Name: The account we created earlier
Service Account Password: Password used
Confirm Service Account Password: Password used
Service Account Name: The account we created earlier
Service Account Password: Password used
Confirm Service Account Password: Password used
For options I am leaving the default , when you are done click Install

3. When you click on Install you might get a message saying the account has too many privileges, just click on No to continue. You can go in and strip out more of the accounts rights, but as a average user, the attack profile will be low.

4. After a few seconds you should see a message that states Bind installation completed successfully. Click Ok, and then click Exit on the installer.

5. We now want to go in and give the user account you have been using full read/write rights to the directory you installed BIND to.

You have now installed BIND on the server and set it up to run as a service. It is important to note that the installer does not copy over the help html files, so if you are going to need those you can move them to a convenient location yourself.
In the first part of this series on Installing BIND DNS I walked you through installing the software on Windows Web Server 2008. The main reason for this of course, is that Windows Web Server 2008 does not allow you to install the Microsoft DNS Role.
In this part of the series I will walk you through an initial configuration of the BIND DNS server. First let’s talk about a few different types of DNS server setups available.
Authoritative Name Servers
Every DNS zone, like www.trainsignaltraining.com, is served by at least one authoritative name server which contains all the DNS records for the zone.
To account for fault tolerance most zones have more than one server that keeps all these records in case of outages. Because of this you will have two types of Authoritative Name Servers — one that keeps the master copy of the zone and that server is called the primary master, and the other called aslave or secondary server that loads their data from the master server by a means of zone replication.
Caching Name Servers
Also called a recursive name server, this is most commonly the local DNS server that your operating system talks to.
When you make a request on your local PC, more than likely it will go out to your ISP’s DNS Caching server which will make a request to the Authoritative Name Server. One of the features of most caching servers is that it will keep that request cached for a certain amount of time to speed lookups.
Creating an Authoritative Name Server with BIND
Once BIND DNS is installed you will see that it is a pretty bare install and needs to be setup via configuration files. For some Wintel administrators this may be a little daunting in an age of GUI interfaces, but don’t worry it isn’t too painful, and gives you good practice for some *nix cross training.
In this demo I am going to create a Authoritative Name Server for the domainbindtest.com at the IP of 192.168.11.13, as a note this is only accessible at my internal network so don’t go searching around for it.
To refresh your memory we installed BIND DNS at C:\Windows\System32\dns
1. Start by opening a command prompt with administrative rights by clicking on the Start menu, right click Command Prompt then left click on Run as Administrator

2. Type in the following at the command prompt hitting Enter after each line:
cd c:\windows\system32\dns\bin (or where you installed BIND)
rndc-confgen –a
rndc-confgen > C:\windows\system32\dns\etc\rndc.conf
rndc-confgen –a
rndc-confgen > C:\windows\system32\dns\etc\rndc.conf
Close the command prompt

3. Open Explorer and go to C:\windows\system32\dns\etc and create the following directories:
run
zones
log
zones
log
Create an empty file in the log directory called named.log

4. Download the following file: named.conf and place it inC:\windows\system32\dns\etc (or wherever you installed BIND).
If you did install BIND in a different directory, then in the named.conf go in and change the location in options for the directory to your install location.

5. You also need to modify the named.conf to change the zone to the domain you want to manage.
In our example I am using bindtest.com, but you need to change this to match your domain. You should also change the file name to replacedb.bindtest.com.txt to db.%yourdomain.com%.txt –replacing %yourdomain.com% with your domain name.

6. Open rndc.conf in notepad (in the etc folder) and copy everything below the line that says:
# Use with the following in named.conf

7. Open named.conf and paste the contents of the clipboard at the end of the file.
Remove all the # from each line and delete the first line copied in and the last line copied in so it looks like the picture below. Save and close named.conf

8. Download the following file: db.bindtest.com.txt and place it inC:\windows\system32\dns\etc\zones
9. Rename db.bindtest.com.txt to whatever you used in step 5, so that the file is named db.%yourdomain.com%.txt — replacing %yourdomain.com% with your domain name.
10. Open the db.bindtest.com.txt (or whatever you renamed it) and modify the following then save the file:
Change any reference to bindtest.com to your domain name
Change the serial line to reflect the current date in this format:YYYYMMDDRR
YYYY = YEAR
MM = MONTH
DD = DAY
RR = Revision number (01 if this is the first time)
YYYY = YEAR
MM = MONTH
DD = DAY
RR = Revision number (01 if this is the first time)
Change the IPs to the IPs that your servers are using

Now you are configured to be an Authoritative Name Server for bindtest.com (or whatever your domain is named) with no recursive lookup.
Open Server Firewall
If you are using a firewall for your server either software or hardware, you will want to make sure that incoming requests on UDP port 53 are open. This will make sure that your server will accept incoming queries.
Start the BIND DNS Service
Ok, we are finally ready to actually start this service. Let’s go in and start this service.
1. Go to the Start button, then to the Administrative Tools, then left click onServices

2. Scroll down and find ISC Bind and right click on it, then click on Start to start the service.

That’s it! The BIND DNS service is now up and running and ready to accept queries. Let’s test out the service.
Testing BIND DNS
I am going to use a very cool tool that is loaded with BIND DNS that’s calledDIG.
You will find it in the bin directory where you installed BIND. The tool will go out and query for a domain name and grab all the DNS records. Let’s take a look:
1. Open a command prompt and navigate to the bin directory

2. Type in the following to get a feel for what you get back and hit Enter:
Dig Yahoo.com any

3. Below you will see a piece of the output:

4. Now that you know what to look for, I am going to use my test domainbindtest.com with the dig tool by typing: Dig @192.168.11.13 bindtest.com any
Note: I use @192.168.11.13 because bindtest.com is not registered with ICANN so it tells dig to use the name server at that address.

5. You can see that the BIND Name Server is responding with the correct information:

We have now configured an Authoritative Name Server for the test serverbindtest.com that responds correctly to DNS requests.
A quick note, when you make changes you will have to restart the ISC BIND Service or run the command c:\windows\system32\dns\bin\rndc reloadfrom a command prompt or batch file.
Subscribe to:
Comments (Atom)